Troika Tuesday: mountaineering rulez
a crash course on multipitch trad climbing -- feel free to skip to the next header
 ^from this website
disclaimer: I can't believe I'm actually fucking writing this, but for Christ's sake, do NOT go real-life climbing armed only with advice from a TTRPG blog post. I'm skipping over a lot of stuff.
Climbing is typically a partnered sport. The Leader ties in to the rope and starts climbing, while the Belayer holds onto the other end. Every so often, they put in a piece of protection, such as a piton hammered into a crack; a screw screwed into solid ice; a sling looped around a tree or boulder; an expansion bolt drilled into bare rock; or a tapered metal 'nut' wedged into a crack. 1 The Leader threads the rope through the protection, so that if they fall the rope catches on it and arrests their downward progress.
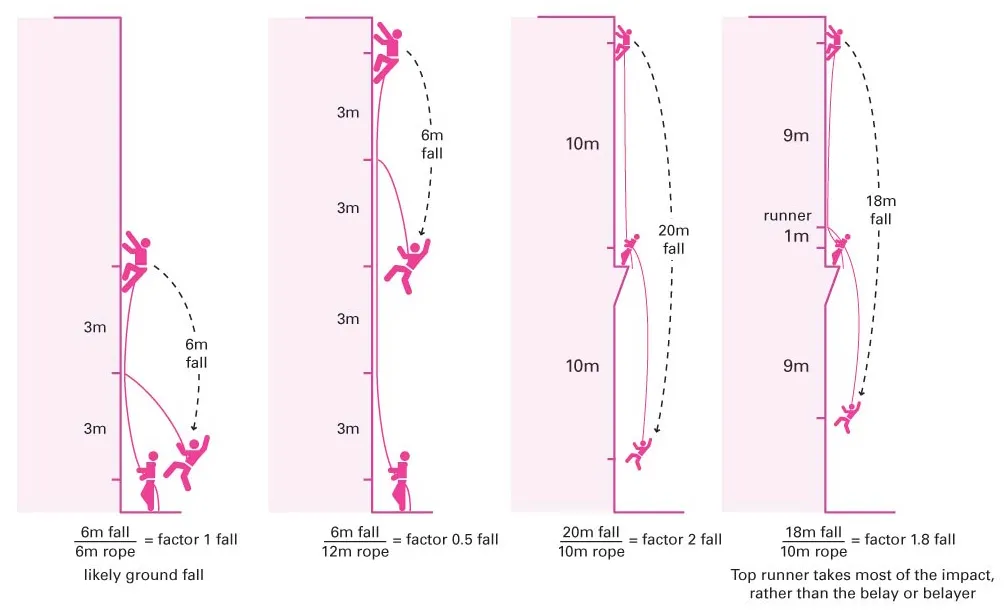
If you're three meters above a piece of protection, that's three meters of 'slack' rope trailing between you and it. You'll fall an additional three meters past the protection before the rope goes taut -- a total of six meters fallen. Just to really spell it out, if you were only five meters up, you'd hit the ground before the rope could save you. Additionally, poorly placed('marginal') protection might simply ping out, and you'll fall even further until the next piece of protection. If you're terribly unlucky, all of your protection could come out, 'zippering' off of the rock as you fall to your demise.
All this time, the Belayer's been paying out rope as the Leader climbs higher and gets further away. In the case of a fall, they hold the rope so that it goes tight. Modern climbers use a metal friction-based braking device, but people used to get by with looping it around their waist, a nearby tree, or a rock to introduce some friction.
When the Leader reaches a good stopping point, they get safe and comfortable and shout down to the Belayer to get ready to follow. The Belayer now climbs, optionally recovering protective pieces that had been placed in the rock. Meanwhile, the Leader is now holding the rope, taking in the slack that is created as the Belayer gets closer to the Leader's position. Falling in this configuration is much safer because the rope goes taut more or less instantly; the Belayer does not fall to, and past, the most recently placed protection.
Now that Belayer and Leader are reunited, the roles can reverse. The Belayer is already tied in to the rope, all of the recovered protective pieces are on their person, and the Leader is now the one holding the rope. So the ex-Belayer is now the Leader, and the ex-Leader is now Belaying. They can play this game of leapfrog all the way to the top.
Hopefully this provides a mental picture of the process of climbing a big cliff. It is interesting chiefly because of the many decision points involved and the constant appraisal of risk. Do I place protection now or save it for later? Do I stop here to belay up my partner or keep climbing? Do I speed up so we can climb in daylight or do I slow down so I know the protection is good in case I fall? Do I take the route with easier climbing on loose rock or the stable rock with very few handholds? etc cetera.
These are the choices I have tried to build into the procedures below.
If that sounds interesting to you, read on. If not, just have the PCs test their Climbing skill. If they succeed, they get to the top. If they fail, they start climbing it only to realize it's not possible and they'll need to find another way up, like a grapnel gun or a helicopter.
players
To climb, make an opposed 2D6 roll versus the pitch you are on. The character adds their Skill Total in Climbing and any other relevant modifiers, and the pitch adds a secret number called Grade.2
In real life, when beginning a pitch, it is customary for climbing partners to go through a verbal call and response (below is a truncated example).
B: Route?
L: Following the hollow flake for 6m, traversing 10m on the system of quartzite crystals to the belay.
B: Nuts, cams, quick draws, slings, helmet?
L: Yes.
B: Climb when ready.
L: Climbing!
In game, you and the Referee will mimic this. First, confirm the route you want to take. The Referee notes down the base Grade of the pitch. Then go through the checklist below. For every question answered 'no', the Grade goes up by 1.
- Properly equipped?
- At full Stamina?
- Above half Stamina?
- At least 1 empty inventory slot?
- Both your hands free?
- Conditions(surface stability, weather, etc) favourable?3
- Good visibility(mist, fog, night/day)?
- Plenty of spare time available?
If all the questions are answered Yes, and your skill Total in Climbing is higher than the Grade, the Referee will let you know that you automatically succeeded.
If not, the opposed roll is made. On a success, you reach the next stance. On a failure, you fall.
falling
Test your Luck. On a failure, compare the result to the table below.
If you are lacking either pitons or rope, the result is always a ground fall, unless you roll double sixes, in which case a giant airborne predator has caught you in its talons.
- Ground fall. If you were very high up, die. If you weren't, you are unconscious at 0 Stamina. Your partner also has to complete the rest of the climb -- up or down -- solo, without a rope.
- Damage as Gigantic Beast. Your rope is broken.
- Damage as Large Beast. Your rope breaks after the next fall.
- Damage as Moderate Beast. Your belayer takes 1 Damage from rope burn.
- Damage as Small Beast.
- Break 1D6 pitons.
- Break 1 piton.
- Lose a random item from inventory.
- Drop anything you were holding.
- You are at the bottom of the pitch. Further attempts today are at +1 Grade.
- You are at the bottom of the pitch.
referees
The main task of the Referee is to design the cliff before the game, and during the game, to fairly telegraph the dangers and difficulties of a proposed route.
design
You can design a cliff much in the same way that you'd design a dungeon. There are two basic elements of a cliff: pitches and stances. A pitch is a stretch of rock face that can only be navigated by climbing. A stance is a spot where a character can stand or hang indefinitely, making a good spot to rest and belay from. You could equate pitches to a dungeon room with traps or monsters, and stances to empty rooms. A good balance of both is important.
In the same way a dungeon should be branching and interconnected, each stance should present at least two choices for progress, whether that be upwards, sideways, or down.
Players may be trying to follow a mapped route, or they may be trying to climb where no man has dared before. In either case, having a half dozen or so pre-written pitches isn't enough. The Referee must be ready to describe and adjudicate pitches on every square foot of that cliff. That sounds daunting, but it doesn't have to be:
the process
- General environs. Describe the average makeup of the rock, e.g. 'smooth granite, buffeted by high winds and moistened by mist.' Determine the average Grade as well -- here we'll call it 2. This way, if ever caught with our pants down, we can assume the next pitch is some variation on wet, smooth, grey rock with a Grade of 2.
- Outline the 'topo'. In climbing parlance, a topo is a simple diagram of the cliff and possible routes on it. Start with a wavy and/or jagged edged rectangle. Roll up some features from the table below, or refer to a reference photo. Sketch them in crudely, label them if you need to.
- Draw stances as little circles on the topo. Ledges, trees, and the beginnings and ends of crack systems make for good natural stances. As a rule of thumb, stances should be 20 meters apart, give or take 10.
- Connect those stances with lines. These are natural faults or landmarks in the cliff that a character would spot from the ground or from their current stance. These represent the 'paths of least resistance'. Again, a reminder to try and keep things interconnected.
- Label the pitches and stances as you would dungeon rooms, and key them up. These pitches are where your design brain can start cooking a bit more -- add NPCs, structures, treasures, tricks, and traps!
- If you aren't comfortable improvising, or you are just willing to get really granular, overlay a grid on the cliff drawing and key each square or hex with a feature and Grade.
- Finally, create a random encounter table and decide on frequency. For example, a snowy mountain may have an Avalanche check every hour, or the route up to an impenetrable fortress might have bat-rider patrols every 10 minutes.
cliff features
There's no way to say that any cliff feature is 'easier' to climb than another. Cracks run from perfect tapered lightning bolts to fingernail-width seams or monstrous offwidths. Slabs run from shallow ladders to mirror-smooth seas of featureless stone. Rolling 1D6 or 1D3 is a perfectly fine way to determine the Grade of a given pitch.
| 1-10 | feature | 11-20 | feature |
|---|---|---|---|
| 1 | slab. a gradient of 90 degrees or less, usually with very small, delicate holds. | 11 | overhang. muscly, tiring on the upper body. |
| 2 | splitter crack. a really good crack, easy to climb by jamming fists and feet into it. | 12 | Limestone. 'sticky', providing good grip even when wet. |
| 3 | offwidth. a crack too wide for fists and feet, but too slim to fit your whole body in. Famously arduous to climb. | 13 | Arete. A corner pointing out from the cliff. |
| 4 | Flake. Big flat projection of rock with a thin space between it and the main cliff. provides ample holds and spots for protection, but has a reputation for coming loose catastrophically. | 14 | Dihedral. Opposite of an Arete. Sometimes has a crack or seam running up the corner. |
| 5 | Horn. Rocky projection, useful for looping rope around or resting on. | 15 | Vegetation. Useful landmark, typically indicates useful things like a ledge for purchase and running water. May hide wild animals. |
| 6 | Chimney. A crack or space between two faces large enough to sandwich your body inside of. | 16 | Crystal formation. Veins and systems of crystals like quartzite are easily recognisable landmarks for route finding, and may offer better holds. |
| 7 | Comglomerate. A type of cliff composed of sedimentary or metamorphic stone interspersed with many smaller pebbles. These pebbles might provide good grip, but could also come loose. | 17 | Choss or scree. Loose, treacherous rock that could give way or slide underfoot. |
| 8 | Granite. Smooth, big holds are rare. | 18 | Spire or needle. A rock tower rising parallel to the cliff. May offer easier climbing up to a certain point, from which you will need to leap or otherwise traverse from the spire's summit back to the main cliff. |
| 9 | buttress. A cape of rock projecting from the mountain. By nature of its formation, will have gulleys to either side of it. | 19 | couloir/gulley. Steep, often with water in it. The former is when a gulley fills with ice and snow. |
| 10 | Bivy/shelter. Either a ledge or cave large enough to spend the night on, or a manmade construction, possibly containing rescue equipment. or memorabilia from previous mountaineers. | 20 | Bolts, anchors. Permanent protection placed by previous climbers. Anchors are systems of bolts installed at stances so you can attach yourself and your party to the rock while you futz around, belay, or rest. |
running a pitch
Make it clear to the players that if they try to climb a difficult route, they could easily die and lose their character. Impress upon them the many factors that could make a climb hard -- smooth or wet rock, lack of handholds, high winds, steep incline, etc cetera -- and do not keep the pre-climb checklist a secret. When describing a pitch, telegraph appropriately. They shouldn't know the precise Grade of a pitch, but they should be able to make a ballpark guess.
Give them every opportunity to change their mind or back out but once they've committed, really let them have it if they fail.
time records
One of the biggest sources of pressure in climbing big walls is time. Weather windows often mean the climb has to get done in a certain amount of time before bad weather comes in and things get deadly. Similarly, the longer you're on the wall, the more your Luck, rations, daylight, and Stamina run out. After every pitch, tell your players how long it took to climb, and how many hours of daylight they have left.
When determining how long a pitch takes, start here:
pitch duration (minutes) = (Grade-Leader's Climbing skill)*10
So if the Grade was 5 and the Leader has 2 ranks in Climbing, it would take roughly 30 minutes.
Miscellaneous timekeeping rules:
- Bringing up the belayer takes half that time.
- The minimum amount of time a pitch can take is 10 minutes.
- Downclimbing takes twice as long.
- After 30 minutes of continuous climbing, the climber takes 1 damage every 10 minutes.
an example topo I made
DUDAH MOUNTAIN, NORTH FACE. AKA 'TIMPIC'S FIST'
BASE GRADE: 4
Vertical sheet of granite, speckled black and white like cookies 'n' cream. Curves into a slight overhang just below the snow-dusted summit. Spiderwebbed with enormous cracks from where Saint Dudah's brother, Timpic, struck it in anger. Some attribute the regular rock falls to these unstable cracks. Others say trolls live halfway up the cliff, trolls who eat lightning and toss boulders at each other for sport.
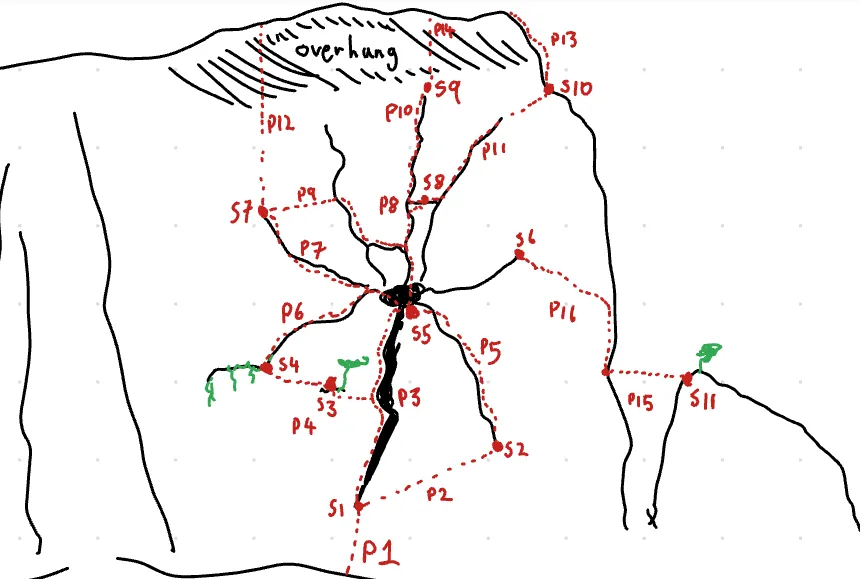
Encounters
Roll 1D6 on the table below every hour.
1: 1D6 TROLLS, armed with big boulders (damage as MAUL).
2: Rockfall -- Test your Luck or get struck for Damage as Large Beast. If climbing, Test Luck again or Fall.
3-4: Weather change -- roll on the hexflower (FYI, I haven't written one for this example).
5-6: Nothing.
pitches
P1. Dudah's toe
Grade: 2
The base of Dudah is bald and steep, save for this spot. The footholds are polished smooth by many feet, but the easy gradient more than makes up for it.
P2. Darren's traverse
Grade: 4
Featureless and sustained, this traverse's one saving grace is that it is not quite vertical.
P3. Lightning crack
Grade: 2
This gaping crack is large enough to fit your whole body and crawl up inside of. It's long though; you'll need a 60m rope, and doing it in one pitch takes an hour. Otherwise, divert leftward at the halfway point to S3 -- this traverse increases the Grade to 2.
special: While in Lightning Crack, rockfalls happen on a 5 as well as a 2.
P4. Mossledges
Grade: 1
Moss clings to a fine network of thin ledges. If it hasn't rained for a week, this traverse is a piece of cake. If it has, the ledges become damp and treacherous, +1 Grade
P5. Windy crack
Grade: 2
Fairly straightforward. In the hours preceding and following dusk and dawn, however, a powerful wind blasts up and down this crack, increasing Grade to 3.
P6. Mosscrack
Grade: 2
Similar to mossledges, in wet conditions Grade increases to 3.
P7. Darren's Bow
Grade: 3
More loose rocks, as fewer climbers take this route.
P8. Dudah's Throat
Grade: 2
Straight as an arrow, perfect fist-width cracks. This pitch used to be easier, but frequent climbing has polished the holds.
P9. Darren's Recurve
Grade: 4
A harder variation of Darren's Bow. Rarely attempted.
P10. Dudah's Throat pt.2
Grade: 3
More straightforward crack climbing, although the crack starts to peter out a bit and the looming overhang is intimidating.
P11. Right-hand escape
Grade: 3
Not too bad until the crack runs out, at which point you've already been climbing for 20 minutes and it becomes quite arduous.
P12. Darren's Arrow.
Grade: 6
The first half is teeth-gritting, agonizing moves on tiny holds over a blank face, and the second half is sustained, crimpy overhang all the way to the top. Hard as fucking nails.
P13. Dudah's Stair
Grade: 2
This pitch circumvents the overhang. The biggest risk is wind and a constant layer of frost and snow.
P14. The Crux Pitch
Grade: 5
Short but very hard, using marginal holds on an overhang with very little protection. Many a climber has gotten to S9 only to be shut down by this pitch, having to backtrack to S8 and ascend by the right-ward escape.
P15. Little Dudah Tyrolean
Grade: 1
One can walk to the top of this hill, toss a grapnel onto a massive flake on the face of Dudah proper, and shimmy across. The only downside is that falling on this pitch only ever results in a ground fall.
P16. Little Dudah Linkup
Grade: 3
Long, meandering route that picks its way through a network or quartzite extrusions.
special: Poor visibility increases Grade by 2 rather than 1.
stances
S1. Base of Lightning Crack
Hosts a small pool of clear, sweet runoff.
up: Cavernous towering chimney, huge boulders jammed in it halfway up.
right: ~30m away, the start of another crack. In between, thin foot and hand holds on an 80-90 degree incline.
S2. Base of Windy Crack
left: ~30m away over a near-blank face, a huge cavernous crack system.
up: A crack wide enough for hands and fists, tending leftward to a large cave 40m up.
S3. Tree ledge
A Sympathy Serpent sleeps in this tree. If awoken it slithers fearfully to S4 and alerts its brethren.
right: Short, moss-covered ledge leads to a cathedral-sized crack.
left: A short mossy ledge leads to a much bigger, more established ledge, dripping moisture and dangling large fronds of lichen. And is that.. moulted snake skin?
up: Totally blank rock. Eventually, the huge cave mouth of S5.
S4. Mossledges belay
Seven Sympathy Serpents nest on this ledge. If night approaches, they hide and ambush climbers who make camp here. Otherwise, they confront and demand a toll of food that still wriggles and weeps.
right: slightly treacherous footing, especially when wet, to a solitary tree.
up and right: An off-width crack at an easy gradient, furred with cool moss. Lots of snake moults.\
S5. Troll Cave
This mansion-sized cave mouth leads to a network of tunnels that penetrate the very core of Mt. Dudah. One hundred trolls live here and guard the ginormous pulsating ruby HEART OF DUDAH, although there are only ever 2D6 at the cave mouth. If feeling friendly, they invite passers-by to a game of Dodge the Boulder.
straight down: Massive, echoing crack, wide enough for two men stood abreast.
down and right: Fist-sized crack, moans and whistles with wind.
left and right: hand-size cracks, not recently trafficked.
straight up: fist sized splitter crack, a small lateral crack/ledge halfway up.
S6: Little Dudah Anchor
A colourful prayer flag flutters from a small iron pole.
right: interlocking patterns of white quartzite veins, providing good handholds, transitions into a downclimb to a house-sized flake facing Little Dudah
left: the start of a crack, begins at fingertip width, over 25m it expands to fists before reaching S5.
S7. Darren's Perch
A tiny ledge big enough for one person. An abandoned rock hammer, harness, and a little tin lockbox. Inside, a postcard of a grinning dude in cargo shorts and mullet, signed: 'Keep Climbin'! -Daz.'
up: Blank rock into a shadowy overhang. There's no way anybody's ever climbed this.
right: Technically feasible, a 10m blank patch of rock before reaching the safety of a crack that trends gently down to S5.
down: Chossy, fist-width crack. Watch your step.\
S8. Middle Ledge
A thin, exposed little ledge, not one to hang out on too long. Two corpses sit here, playing cards still in their hand. They are both Living Dead who awaken at night and continue playing their hands.
left: Traversing a couple steps takes you onto a glorious splitter crack leading from S5 nearly to the summit.
right: A decent crack peters out with 15m still to go before you reach an arete with a good ledge. It looks pretty sustained.\
S9. Last Chance Saloon
A hanging belay: put protection into a handy crack full of rusty pitons, clip yourself to it, and sit back into your harness, dangling over thin air. Gives ya the heebie jeebies.
up: An overhang with small, difficult holds. It's short, though. 10m or less. Really only a few moves before you're at the top..
down: A nice, clean, hand width crack. Well polished.
special: when Belaying from this stance, if your Leader suffers a ground fall, you are pulled to the ground also. Double fatality!
S10. Dudah's Landing
A big ledge, comparable in square footage to a studio apartment. Unparalleled vistas of the Stone Saints Gorge. Constant tinkle of snowmelt. Sometimes you see a pure white fox. Dudah herself?
up: Easy climbing to the top. It's basically a ladder. Careful of the slippy ice though.
down, left: ~10m of sketchy moves over blank rock before reaching a relatively safe hand-width crack.
S11. Little Dudah
A stout tree wrapped in tatters of hemp. 2 abandoned grappling hooks with no ropes attached.
special: 2-in-6 chance another climber is here, winding up with their grappling hook, to attempt the Tyrolean traverse.
examples of real life topo
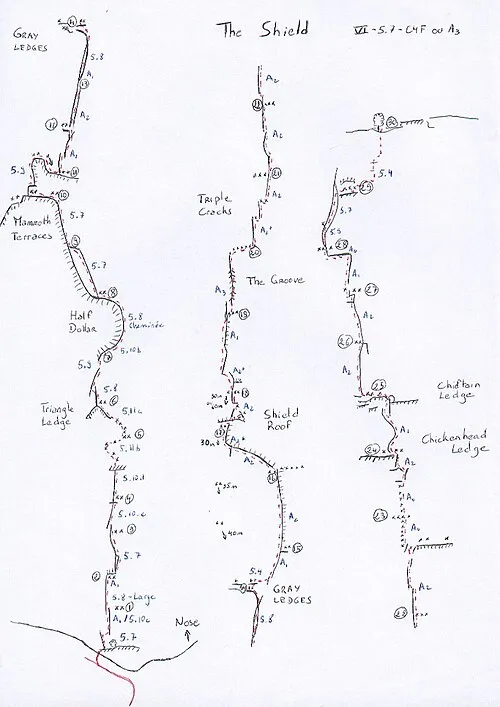
Below is an example of a climbing 'topo' from this blog. Note how in line with OSR aesthetics the pleasant shitness of it is.
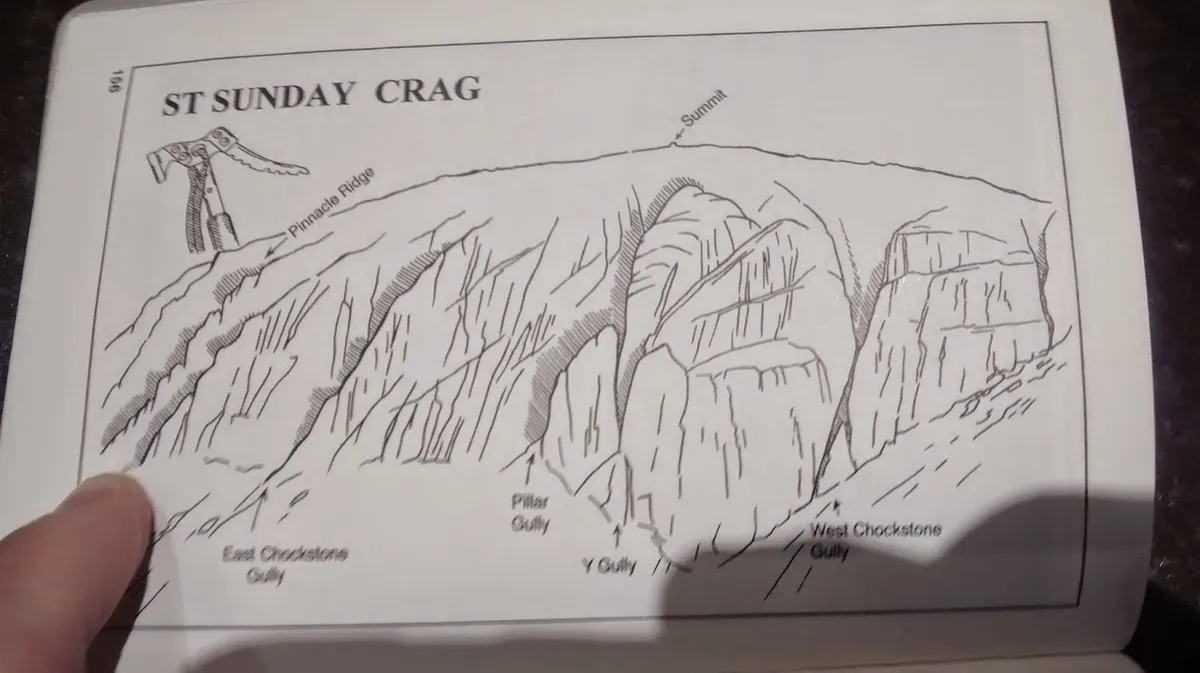
Here's a topo from Wikipedia of a very large cliff. It looks like a DnD player could have drawn it at the table.
what about placing protective gear?
Gear placement is a hugely important part of trad climbing. However, I anticipate that to game out when and where to place pro would be too granular to be fun. To be satisfying, it would require each protectable feature to be intricately mapped out on the cliff face. that's more work than I'm willing to do as a GM, and I don't want action to be slowed down. I like crunch in my downtime, but when it comes to the action, I want it resolved decisively, in a couple rolls or less. So gear placement is abstracted as part of the Climbing and Luck tests, and emphasis is placed on route finding, time management, and equipment/preparation before the pitch is attempted. Ya dig?
There are many more that defy my descriptive abilities. Try looking up cams, tricams, big bros, hexes, lowe ball nuts, monkey's fists, chockstones, and V-threads if you are interested in learning more.↩
If you have a guidebook, it might tell you the Grade of a given pitch. Route finding errors may find you attempting a high-Grade pitch when you thought you were on an easier one.↩
If weather is particularly horrible, Grade may be increased by more than 1.↩